
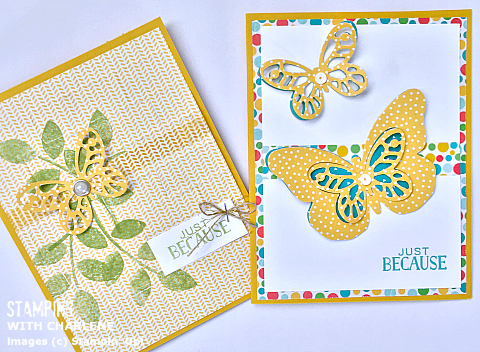
Yesterday, I showed you a simple card using the Bold Butterfly Framelits Dies, Cherry on Top Designer Series Paper Stack, and Tin of Cards Photopolymer Stamp Set (shown on the upper left.) Today, I am going to show you another card using the exact same items, but with a completely different look and feel. The only thing I changed was the color of the ink and the tiny embellishment that I used on the body of the butterflies.

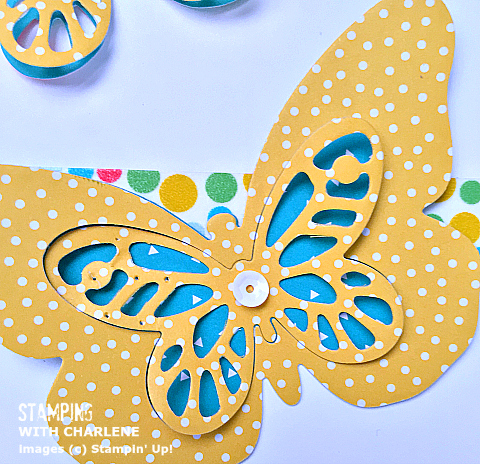
For the smaller butterflies on the top:
- die-cut two small butterflies with two coordinating pieces of Designer Series Paper
- attach the butterflies one on top of the other at the center of the butterflies’ bodies so that the wings of the top butterfly can stick up from the butterfly on the bottom

For the big butterfly on the bottom:
- die-cut two large butterfly pieces
- use the small butterfly die to die-cut the middle out of the top butterfly
- attach the small butterfly to the center of the bottom butterfly
- lift up the wings of the small butterfly
That’s all there is to it! What makes the Bold Butterfly Framelits Dies so wonderful is that fact that I used them with the Cherry on Top Designer Series Paper to create two completely different looks. Versatility is a wonderful benefit of Stampin’ Up! products. When you combine the versatility with the fact that our papers and inks coordinate, the possibilities of the things you can create are endless.
Be sure to visit again tomorrow for another great project using the Bold Butterfly Framelits Dies. Can’t wait!
Built for Free Using: My Stampin Blog